Post-Processor Customization
This section outlines the customization features of QUEST. The image below shows the main customization features accessible using the Navigator.
Startup and Shutdown Procedures allow you to write macros that are run when special events happen during post-processing.
The Tape Editor allows you to perform systematic search/replace string operations on the MCD as it is generated by GENER.
The Dialog Editor allows you to build dialog boxes, which can then be used by GENER to query the NC programmer for any additional information that is necessary during post-processing.
User Defined Syntax Macros are used to develop and support your own variations of post-processor commands.
User Function Macros are used to develop your own macro functions that can be called by other macros in the post-processor.
The File Storage section holds read-only data files that can be accessed by the macro processor, as well as (for example) post-processor specifications and documentation of interest to the post-processor developer.
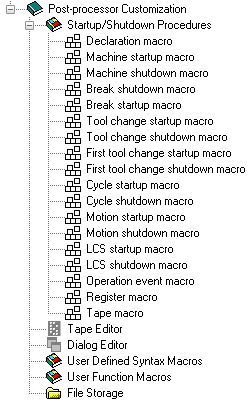
Post-processor Customization Navigator View
Startup/Shutdown Procedures
Startup and Shutdown procedures enable customization of GENER processing at the start and end of certain key events. Customization is done using the ICAM Macro language (see “The Macro Language”). Generally speaking, macros can extend or replace built-in Icam Post functionality. The following startup/shutdown procedures are available:
Macro Type
When Executed
Start of macro processing
Start and end of program
Start and end of new program segment
Start and end of tool change
Start and end of first tool change
Start and end of canned cycle
Start and end of motion
Start and end of LCS change
Start of operation
Processing of a register
Processing of a block of MCD
Processing of a diagnostic
Double-click on the “Startup/Shutdown Procedures” heading in the Navigator to open the Startup/ Shutdown Procedures view in the working window as shown in the image below.
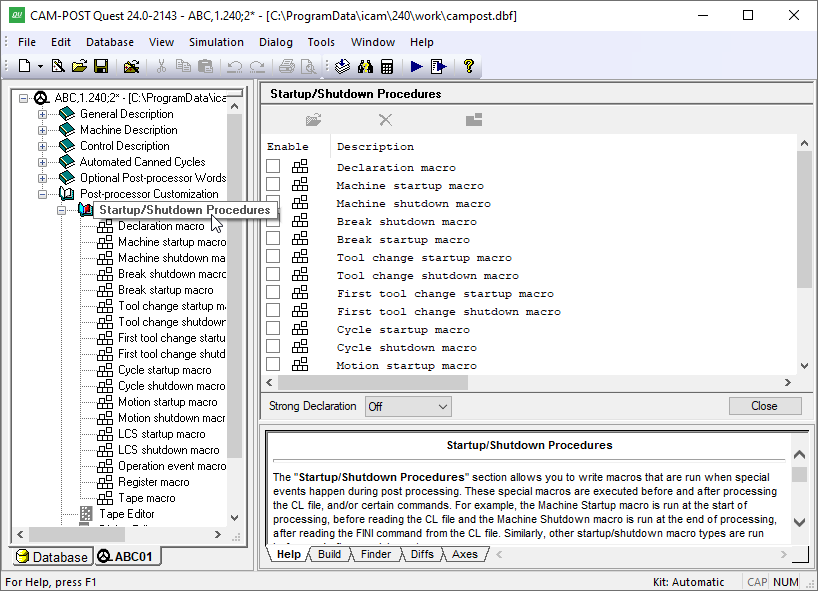
The Startup/Shutdown Macro Facility
Select a macro name and press the Modify button to create or edit it. Macros can also be opened for editing by double-clicking on the macro name in the Navigator window. To ignore a macro during GENER processing either uncheck the Enable box to disable it, or select the macro name and press the Delete button to remove it. The “Strong Declaration” setting is used in concert with the Declaration macro.
Some startup/shutdown macros are passed information about the event that has just happened. For example, a tool change startup macro will be given information about the tool number that has been selected. These are called $P arguments, named after the variable type that is used within the macro to access the data. Some $P arguments can also be set inside the macro to change the outcome of the event. Tables listing the $P arguments for each of the different macro types can be found in “Invoking Startup/Shutdown Procedures”. The available $P arguments are also listed in the lower right Help window when you edit a macro.
Startup/Shutdown Macro Types
Declaration Macro
The declaration macro is executed once only, at the start of macro processing. Its sole purpose is to provide a standard place to define global variables and external user defined functions that are shared amongst the other macros of the post-processor. No other commands can be specified in a declaration macro.
The declaration macro is used in combination with the “Strong Declaration” macro setting that appears at the bottom of the RMD and macro editors. This setting determines how strongly the macro compiler and processor should enforce the recommended programming convention that variables be declared before they are used.
See “Declaration Macro” for more information about the declaration macro and the strong declaration settings.
Machine Startup/Shutdown Macros
The machine startup and shutdown macros are executed at the beginning and end of CL file processing respectively.
The machine startup macro is useful for performing initialization type operations. For example, the predefinition of tool and/or head parameters using TOOLNO commands, or the initialization of the relationship between CL file and machine coordinate systems using the ORIGIN command.
The machine shutdown macro is equally useful for performing any operations you might want to have executed at the end of the program. For example, the “End of program” action generates (typically) an M02.
With a composite post-processor, the component startup macro is executed each time the component is activated (e.g., by the APPLY command or $FAPPLY macro function) and the component shutdown macro is executed just before switching to another component.
Break Startup/Shutdown Macros
The break startup and shutdown macros will only appear if tape segmentation is available, as specified in the BREAK section of the “Optional Post-processor Words” chapter.
The break shutdown macro is run just before the tape is segmented, in the same way that the machine shutdown macro is run at the end of the entire program. You can place actions in the break shutdown macro to handle any special requirements needed at the end of the current program segment before breaking the tape.
Similarly, the break startup macro is run after the tape has been segmented, but before processing continues reading the CL file. You can place actions in the break startup macro to handle any special requirements needed at the start of the new program segment.
Select the “Use machine macro” option in the Break Startup or Shutdown RMD editor to use the machine startup and shutdown macros instead of the break startup and shutdown macros when breaking tapes.
Break macros can be turned off and on using the $BRKMAC macro system variable (see “Macro Variables”). Set $BRKMAC to $FALSE to disable break or machine macro processing at a tape break; set $BRKMAC to $TRUE (the default) to enable break or machine macro processing for each tape break.
Tool Change Startup/Shutdown Macros
Tool change startup and shutdown macros are executed just prior to and immediately following a tool change operation. The tool change startup macro can be used to change parameter settings for the command (e.g., setting the tool length compensation parameter if omitted) and to perform any custom operations necessary before changing the tool. The tool change shutdown macro can likewise be used to perform any special initialization necessary once the new tool is loaded. See “Tool Change Startup/Shutdown Macros” for the list of $P variables available to a tool change startup macro.
First Tool Change Startup/Shutdown Macros
The first tool change startup and shutdown macros are executed just prior to and immediately following the first tool change operation. They are identical in all respects to the normal tool change macros, except that if defined, these macros are used on the first tool change.
The $FT macro system variable can be used to force a “first” tool condition at the next tool change (see “Tooling Variables”). By default, only the first tool change qualifies.
CYCLE Startup/Shutdown Macros
The cycle startup macro can be used to inhibit or change key cycle parameter values for the upcoming cycle block. The startup macro can also be used to output special codes necessary for the cycle that are not otherwise handled by Icam Post.
For post-processors defining “Macro” driven cycles (Automated Canned Cycles / General Drill Cycle Information question #1), the startup macro is responsible for outputting all cycle parameters with the exception of the positioning axes. RMD actions are available to handle the special cycle requirements of Siemens and Heidenhain controllers, as follows:
HEIDENHAIN Conversational drilling cycles
HEIDENHAIN ISO drilling cycles
SIEMENS drilling cycles
On machines with “activator” type cycles, the startup macro will be invoked twice each time the activator block is output. The first invocation of the macro will be for the activation definition block; the second invocation will be for the cycle control point.
See “Cycle Startup/Shutdown Macros” for the list of $P variables available to a cycle startup macro.
The cycle shutdown macro is invoked immediately following the cycle block.
Cycle macros can be turned off and on using the “Enable CYCLE macro” and “Disable CYCLE macro” RMD actions. These RMD actions set and clear a $CYCMAC macro system variable (see “Macro Variables”). Set $CYCMAC to $FALSE to disable the cycle macro; set $CYCMAC to $TRUE (the default) to enable cycle macro processing for each cycle point found.
Motion Startup/Shutdown Macros
Motion macros are used to output information before and after motions found within the CL file and other macros. They can also be used to suppress motions under certain conditions and to process additional motions if necessary. Information about the specific motion is available to the macro in a set of $P variables (so called because these variables all start with the characters “$P”). See “Motion Startup/Shutdown Macros” for the list of $P variables and their meaning.
A motion startup macro is run just before a motion is processed. Circular, spline and pattern motions call the motion macro once, at the start of the motion, not once for each intermediate point that makes up the original CL file specification of the compound motion. Sometimes GENER will segment a motion into smaller parts (perhaps due to linearization or for safe positioning). The motion macro will be called once only at the start, not once for each segmented move.
A motion shutdown macro is run after the motion has completed processing.
Motion macros can be turned off and on using the “Enable motion macro” and “Disable motion macro” RMD actions. These RMD actions set and clear a $MTNMAC macro system variable (see “Macro Variables”). Set $MTNMAC to $FALSE to disable the motion macro or to $TRUE (the default) to enable motion macro processing for each motion found.
LCS Startup/Shutdown Macros
The LCS startup and shutdown macros will only appear if LCS (local coordinate system) transformation is available, as specified in the “Coordinate System” section of the “Control Description” chapter.
The LCS startup macro is run when GENER is about to output the codes to either activate or deactivate LCS. Information about the specific LCS change is available to the macro in a set of $P variables. See “LCS Startup/Shutdown Macros” for the list of $P variables and their meaning. When the LCS startup macro exits, GENER then performs the LCS change.
The LCS shutdown macro is run after the LCS processing has completed. The LCS startup and shutdown macros can be used to fine tune the output before and after the LCS change, and even to replace the default LCS codes output by GENER.
LCS macros can be turned off and on using the “Enable LCS macro” and “Disable LCS macro” RMD actions. These RMD actions set and clear a $LCSMAC macro system variable (see “Macro Variables”). Set $LCSMAC to $FALSE to disable the LCS macro; set $LCSMAC to $TRUE (the default) to enable LCS macro processing for each change in LCS.
Operation Event Macro
An operation event (OE) macro is executed at the start of each manufacturing operation, as identified by an OPTYPE command in the CL file. The macro is called when the OPTYPE command is processed by GENER. The $P variables of the macro and the $OE system variables contain information about the upcoming operation. See “Operation Event Macro” for details.
The OE macro can be turned off and on using the “Enable OE macro” and “Disable OE macro” RMD actions. These RMD actions set and clear an $OEMAC macro system variable (see “Macro Variables”). Set $OEMAC to $FALSE to disable the OE macro or to $TRUE (the default) to enable OE macro processing for each new operation.
Register Macro
A Register macro is executed whenever a register is about to be added to the current tape block buffer. The macro is called before the register is written to the buffer. Register macros have restrictions on the types of commands and actions that are allowed. See “Register Macro” for details on these restrictions and the list of $P variables available to a register macro.
The register macro can be turned off and on using the “Enable register macro” and “Disable register macro” RMD actions. These RMD actions set and clear a $REGMAC macro system variable (see “Macro Variables”). Set $REGMAC to $FALSE to disable the register macro or to $TRUE (the default) to enable register macro processing for each register to be output. There is also a $REGMATCH sequence variable that can optionally be used to restrict the registers to be matched.
Tape Macro
A tape macro is executed whenever the tape block buffer is ready for output. The macro is called before the buffered NC block is written out to the tape file. Tape macros have restrictions on the types of commands and actions that are allowed. See “Tape Macro” for details on these restrictions and the list of $P variables available to a tape macro.
The tape macro can be turned off and on using the “Enable tape macro” and “Disable tape macro” RMD actions. These RMD actions set and clear a $TAPMAC macro system variable (see “Macro Variables”). Set $TAPMAC to $FALSE to disable the tape macro or to $TRUE (the default) to enable tape macro processing for each block of tape to be output.
Diagnostic Macro
A diagnostic macro is executed whenever a diagnostic (message, warning, error, fatal) is processed. The macro will be called even if the diagnostic is disabled, however it will not be called if all diagnostic processing is disabled via the $ERRMSG system variable. The macro is called before the diagnostic is output and counted in the statistics. Diagnostic macros have restrictions on the types of commands and actions that are allowed. See “Diagnostic Macro” for details on these restrictions and the list of $P variables available to a diagnostic macro.
The diagnostic macro can be turned off and on using the $DIAGMAC macro system variable (see “Macro Variables”). Set $DIAGMAC to $FALSE to disable the diagnostic macro or to $TRUE (the default) to enable diagnostic macro processing for each diagnostic that occurs.
The RMD Facility
Startup/shutdown macros are created using the RMD facility as shown in the image below.
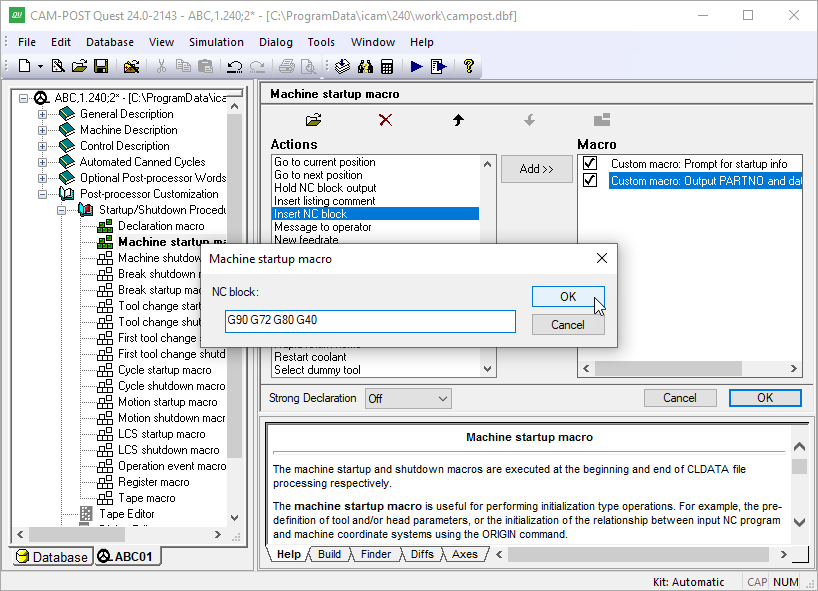
The RMD Facility
RMD is an acronym for Rapid Macro Development. The RMD facility lists a series of predefined actions in alphabetical order, which you can assemble like building blocks, to create the final macro. Two special macros are listed at the top:
The “Custom macro” action lets you develop your own macro code using the full power of Icam Post’s macro language. See “User Defined Syntax Macros” for details on editing, compiling and saving macros. See “The Macro Language” for details on macro programming.
The “Any PP Command” action lets you type in post-processor commands, to be executed by the macro processor.
To add a new macro action, select it from the list of actions on the left and then press the “Add»” button in the middle column. Actions are added below the currently selected action in the right-hand list of actions that make up the current macro. You can reposition an action by selecting it in the right-hand list and then pressing the up-arrow and down-arrow buttons at the top of the window, or you can use a drag-and-drop action using the mouse pointer.
To delete an action from the macro, select it in the right hand list and then press the delete key on the keyboard or the “delete” button at the top of the window.
To modify an existing macro action, select it in the right hand list and then press the “open” button at the top of the window. You can only modify actions that required some additional input when they were added. For example, the “Custom macro” and “Any PP Command” actions can be modified whereas the “Display the date” action cannot.
The convert button at the upper right can be used to convert the selected actions in the right hand list to a “Custom macro” type. This then allows these actions to be opened and their macro code modified. For example, selecting a “Display the date” action in the right hand list and converting it to a custom macro, then allows it to be opened and edited.
Individual macro actions can be enabled or disabled. Actions are enabled by default when added. Clear the check box to the left of an action to disable it. A disabled action will not be executed by the post-processor. Disabled actions can only be re-enabled in the questionnaire (i.e., there is no facility to dynamically enable/disable individual macro actions in GENER).
The “Strong Declaration” setting defines how strict the macro processor is concerning the timing and location of macro variable declarations (see “Declaration Macro”).
Tape Editor
The tape editor performs simple editing of the MCD as each block is generated by GENER. Editing of the tape file is the last function performed before the MCD is written out to the NC program file.
Tape editing is done through a set of character string replacement functions, as shown in the image below. You can perform simple character for character substitution or you may define the search strings in term of regular expressions (RE’s), as defined in the $FEDIT function (see here).
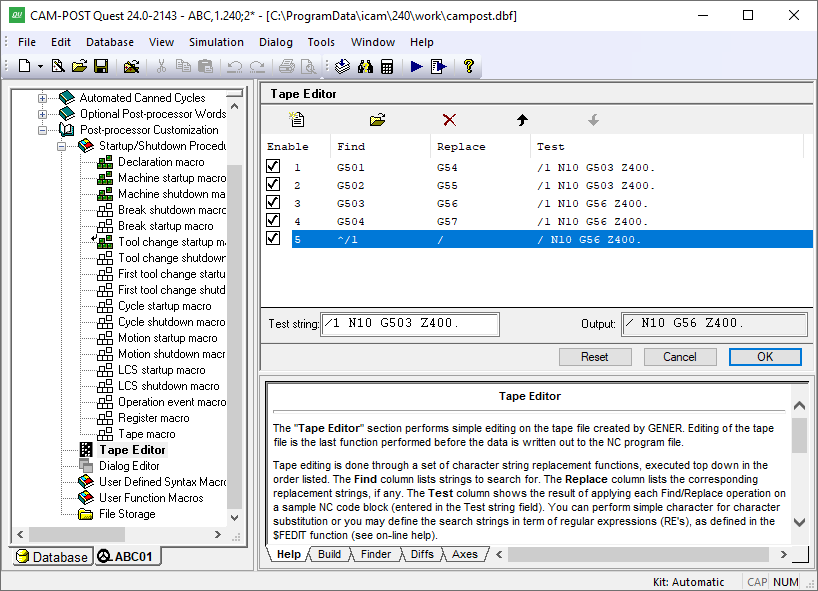
The Tape Editor Facility
Press the Add button to enter a new find/replace string pair. The “find” string is what GENER will look for in the MCD. The “replace” string is what GENER will replace it with. An empty replacement string has the effect of deleting the “find” string where it occurs in the MCD. Only the first occurrence of the “find” string is replaced (or deleted). There is no facility to define a global or repetitive replacement.
New find/replace string pairs are added to the list below the last selected pair. Use the up-arrow and down-arrow buttons to reorder the string pairs (you can also reorder them with the mouse using drag-and-drop). The order can be important, since GENER applies the find/replace strings once only per block of MCD, in the order that they are listed.
Select a string pair and press the Modify button to change one or both strings. Select a string pair and press the Delete button to remove it.
Individual find/replace strings can be enabled or disabled. They are enabled by default when added. Clear the check box to the left of a string pair to disable it. A disabled string pair will not be executed by the post-processor. Individual find/replace string pairs can also be dynamically enabled and disabled during processing using the $EDTSTA(n) macro variable (see “Macro Variables”), where n is the find/replace string pair identifier as listed beside the check box.
You can enter sample MCD to test out the tape editor. The final result will be shown, as will the result after applying each of the find/replace string pairs in turn. For example, the “The Tape Editor Facility” image shows a G503 code being substituted by a G56 code.
The Finder utility includes a “Tape Editor” option to include tape editor definitions when searching through a post-processor for matching text. The Diffs utility also checks for differences in tape editor definitions when comparing post-processors.
The following table lists some tape editor Find/Replace substitutions you might find helpful:
Find
Replace
Description
;.*Delete tape comment starting at ; character
(.*)Remove type 2 “(…)” instruction
^/\([^0-9]\)
/1\1Replace “/” with “/1” at start of block
The Dialog Editor
The Dialog editor is used to build dialog boxes, which are then used in GENER to query the user for any information that is necessary during post-processing. You can create many different dialogs, each with a unique name, which are then activated using the $FDIALOG macro function call.
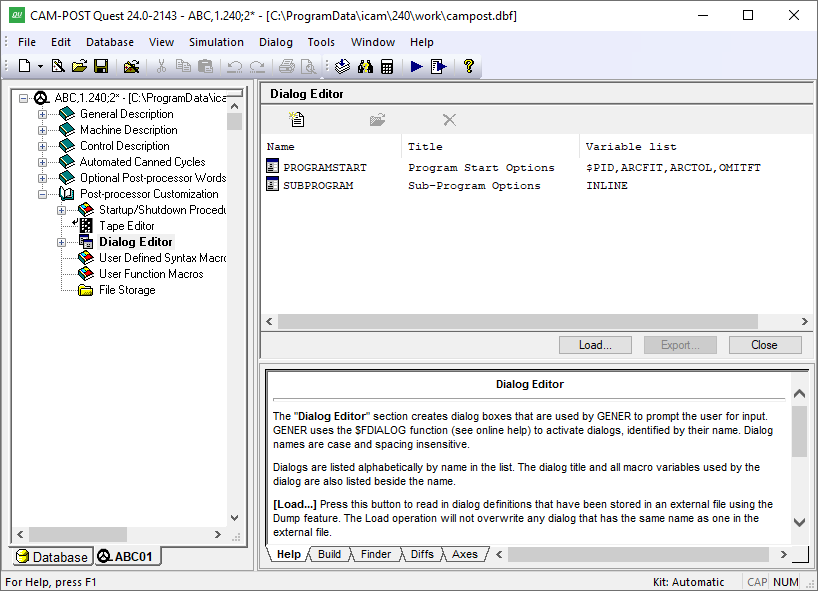
The Dialog Editor Facility
Press the Add button to create a new dialog. You will be prompted for the dialog’s name, which is how the dialog will be identified in the $FDIALOG function call. Spacing and letter-case are not significant in dialog names. Dialogs are listed alphabetically by name. For each dialog, the listing includes its name, the caption title that will appear at the top of the dialog window and a list of all macro variables referenced by the dialog (dialogs operate by getting and setting macro variables). Note that a single dialog containing all user input requirements is generally preferable to the user (if properly constructed) than a series of smaller dialogs.
Select an existing dialog from the list and press the Modify button (or double click on a list entry) to make changes to an existing dialog. Select one or more dialogs and press the Delete button to remove them from the post-processor. This function cannot be undone.
There are also Load and Dump buttons that can be used to read and write dialog definitions from/ to external files. Use this feature to copy dialogs from one post-processor to another, or to create “external” dialogs that can be accessed by any post-processor. We recommend that you do not edit dialog definitions by hand.
The Finder utility includes a “Dialogs” option to include dialog definitions when searching through a post-processor for matching text. The Diffs utility also checks for differences in dialogs when comparing post-processors. Dialogs are listed in XML format in the Finder and Diffs windows.
The Dialog Template Editor
When a dialog is first created it consists of a single window frame and two buttons: OK and Cancel. The image below shows an example of the dialog template editor.
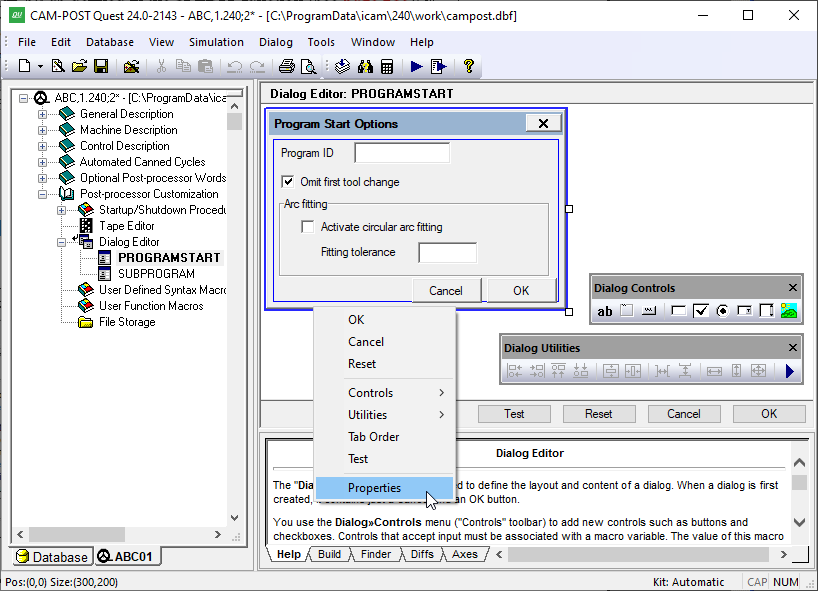
The Dialog Template Editor
The window frame can be resized by selecting it and then dragging (with the left-mouse button held down) one of the three resize points on the exterior of the window. You can also double-click on the window to edit the windows “Properties”, which include: its caption title, name, size in screen pixels and margin (like the margins of a printed page). Similarly, the OK or Cancel button can be selected and resized using the mouse, or double-clicked on to edit its button properties. This behavior is true for all dialog “controls”.
Dialogs can contain a number of different types of window controls, which can be selected from the Controls toolbar or from the Dialog»Controls menu. To create a new control, select the control type and then interactively place it on the window frame. After placing the control, you will be prompted for the control’s properties. The following control types are available:
Text: Use this control to add text to your dialog. Properties include the position and the text itself. You can use line breaks in the text input field to show multi-line text in the dialog. The text control is automatically sized to the required text width and height.
Frame: Use this control to visually group related dialog controls. Properties include the text label that appears at the top-left corner of the frame and the position and size of the frame.
Button: Use this control to create buttons, such as the OK and Cancel buttons. Properties include the text label that appears inside the button, the type of button and the position and size of the button. Buttons with an “OK” type cause the dialog to close when they are pressed, returning the button label text (e.g., “OK”) as the return value to the $FDIALOG function and all dialog macro variables set as shown in the dialog. Buttons with a “Cancel” type cause the dialog to close, returning the button label text (e.g., “Cancel”) and leaving all dialog macro variables unchanged (but initialized if necessary). Buttons with a “Reset” type don’t close the dialog; instead, they reset all controls to their initial state. Buttons with a “Call Dialog” type activate the specified dialog when pressed. A dialog called in this manner must reside in the same post-processor or external file as its caller. You can choose to display (and return) any text you want for a button.
Edit box: Use this control to create a field that will optionally accept user-typed input. Properties include the default value for the field, its associated macro variable, the position and size of the edit box field, an “editable” flag indicating if the field can be changed by the user and a “numeric only” flag with optional minimum/maximum range limits to force user input to be numeric. When the $FDIALOG function is called, the edit box field will initially be set to the macro variable value. The edit box field will instead initially be set to the default value if the macro variable does not exist, or is $NULL, or is an empty string. The macro variable will be set to the contents of the edit box field when an OK type button is pressed.
Check box: Use this control to accept logical True/False type input from the user. Properties include an optional text label that will appear to the right of the check box, the default set/clear state for the check box, its associated macro variable and the position of the check box control. When the $FDIALOG function is called, the check box field will initially be set if: the variable is logical and is true; or the variable is numeric and non-zero; or the variable is text and is $TRUE. The check box field will initially be cleared if: the variable is logical and is false; or the variable is numeric and zero; or the variable is text and is $FALSE. The check box field will instead initially be set to the default value if the macro variable does not match any of the preceding, or does not exist, or is $NULL. The macro variable will be set to one of the true/false conditions, based on the macro variable type, when an OK type button is pressed.
Radio button: Use this control to present the user with a series of exclusive choices. Properties include an optional text label that will appear to the right of the radio-button, an optional alternate return value, an initial state setting, its associated macro variable and the position of the radio-button control. When a radio button is selected, the macro variable will be set by default to the label text. You can choose to return something different for the variable by specifying an alternate return value (e.g., a number). You must have two or more radio button controls sharing the same macro variable. You can choose which one is the default state (setting the default state in one control clears this flag in the others). When the $FDIALOG function is called, the radio-button that first matches the current macro variable is the one that will be shown selected. The default radio button will be shown selected if no match was found. When an OK button is pressed, the macro variable will be set to the label text or alternate return value text of the selected radio button.
Combo box: Use this control to present the user with a number of listed choices, available in a drop-down menu. Properties include the list of valid choices and/or a macro variable that will define the acceptable choices, the default value for the combo box, its associated macro variable and the position and size of the combo box field. If you choose to use a variable to define the list of choices, this variable must either be declared as an array or created as a sequence. It must be initialized before calling the $FDIALOG function. The default value will be used if the macro variable does not match any of the choices. The macro variable will be set to the selected choice type when an OK button is pressed.
List box: This control is similar to the combo box control, except that the choices are visible in a scrolling list.
Picture: Use this control to display an image in the dialog. Supported image formats include bmp, gif, jpg and png.
All dialog controls (except for Picture) include a “Logical state expression” property, which can be used to enable or disable the control. The logical state expression can be any valid macro logical expression that evaluates to $TRUE or $FALSE. If an expression is present and it evaluates to false, the control will be disabled (i.e., not available for selection or modification), otherwise the control will be enabled.
All dialog controls accepting input include a “Help tip text” property, which can be used to provide helpful information to the user in the form of a tool-tip that will appear when the mouse pointer hovers over the control.
Controls are initially placed inside the dialog using the mouse. Once created, they can be repositioned, aligned and sized relative to other controls using the arrow keys and the functions available from the Utilities toolbar, or from the Dialog»Utilities menu. Hold the Ctrl key when resizing a control to retain its current aspect ratio. To reposition two or more controls, select each in turn with the left-mouse button while holding the Ctrl key, then use the arrow keys or press and hold the left-mouse button to reposition the selected controls.
The Dialog»Tab Order menu function specifies the order in which controls are visited when you press the tab key. The Dialog»Test menu function can be used to try out how dialogs will behave when they are used in GENER.
User Defined Syntax Macros
This section lets you define your own post-processor commands and variations of existing commands. This is done by creating macros that will “match” commands read from the CL file. These macros can in turn do whatever processing is necessary for the matched command. See “The Macro Language” to learn how to program using the macro language.
Double-click on the “User Defined Syntax Macros” selection in the Navigator to open the main macro view in the working window. This view shows all user-defined macros and also shows startup/shutdown macros if the “Show RMD macros” check box is selected. An image of the User Defined Syntax Macros main view is shown in the image below.
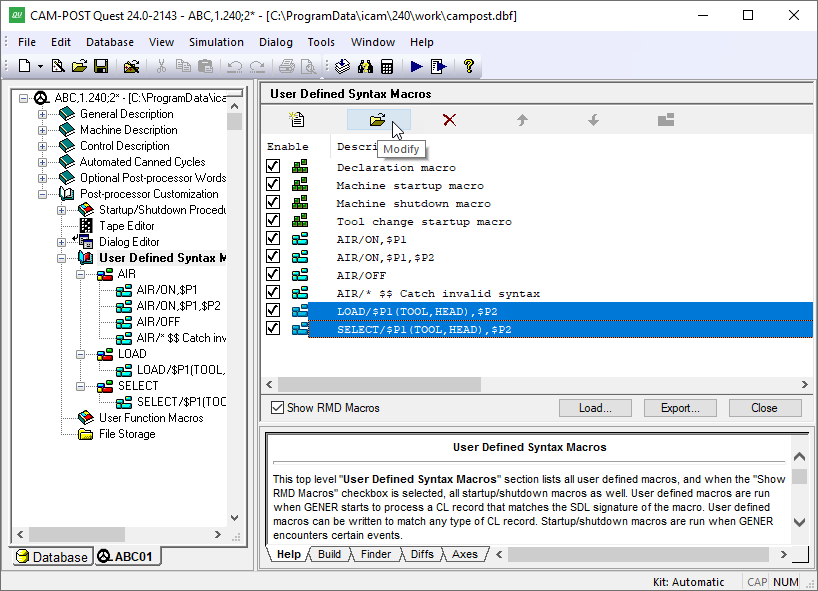
The User-Defined Syntax Macro Facility
The navigator groups macros by post-processor major word (i.e., command). You can view the list of all macros for a specific command by double-clicking on the command name in the navigator. You can open a macro for editing by double-clicking on the macro definition in the navigator or in the working window. You can edit multiple macros by first selecting them in the working window (use the CTRL and SHIFT keys with the mouse) and then pressing the “Modify” button.
Adding Macros
Press the Add button to add a new macro. You will be presented with a list of all known post-processor commands, otherwise known as Major words. The complete list of standard major words can be found in the “Post-Processor Major Words” annex. You can add new words using the Tools»Words Manager menu-bar selection. Once added, they will appear in the list of available commands. Icam Post internally represents all keywords by their associated integer code. When adding new Major words, use codes 1900 through 1999 to avoid conflicts. When adding Minor words (i.e., keywords that are only found to the right of the / character in post-processor commands), use codes 900 through through 999. The words manager keeps track of new keywords in a words file (see the “words” symbol definition in “The ICAM.DEF File”).
When a new macro is added, the macro editor occupies the main work space. The first line of the macro will contain the selected word followed by a / character. This first line of the macro is called a Syntax Definition Line, or just SDL for short. The SDL defines under what circumstances the user-defined macro should be run. Simple SDLs, like “AIR/OFF”, specify that the macro should be run when that exact command is read from the CL file. SDLs can also contain required and optional parameters, to handle even the most complex syntax requirements. A complete discussion of SDLs can be found in “Invoking User Defined Macros”.
The remaining lines of the macro define the actions to perform when the macro is matched. GENER replaces the original command with the contents of the macro, which can contain assignments, logic statements, loops, other post-processor commands and even the original “matching” command. In this way macros can be written to perform actions or commands before, after, or instead of the matched command. Post-processor commands that are coded inside macros are processed by GENER in the same way as those that come from the CL file. This means that they are also candidates for macro matching. This also means that macros can “call” other macros using post-processor commands (there is no practical limit on how deeply macros can be nested).
Loading and Exporting macros
Press the Export button to select the user-defined macros to be written in ASCII format to the selected file. Each macro is followed by an ENDMAC command in the generated file.
Press the Import button to replace all user-defined macros with those defined in the selected ASCII file. Note that this action cannot be undone.
Macro Editor
The macro editor colorizes the macro code as you type it, with comments in green, macro commands in blue, et cetera. The colorization scheme can be changed from the “Macro Editor” tab of the Tools»Preferences menu-bar selection. The editor also provides the following right-mouse button pop-up features:
Expression Evaluator: Use this feature to create, modify and test $FEDIT and $FMATCH macro function calls. Place the input cursor over the function name and select this function to edit an existing call. If the cursor is not on a $FEDIT or $FMATCH call, a new call will be created.
Show line numbers: Enables the display of line numbers to the left of each line.
Show whitespace markers: Shows a ‘·’ in place of blanks and an arrow in place of tabs.
Enable Word Completion: Use this feature to have the macro editor display a list of possible system variables or function names that match the text typed so far. Type any punctuation to accept the highlighted name; press the Esc key to ignore the suggestion.
Comment/Uncomment: Use this function to add comments or remove comments from a block of selected macro lines. If all macro lines in the selected range have comments, then one layer of comments will be removed from the entire block. If any or all lines in the selected range are not already commented, then a new layer of comments will be added to the entire range.
Resequence $P Variables: Use this to resequence the $P variables on the SDL line so that the first is $P1, the second $P2 and so on. This function is only available after first pressing the Compile button on a macro that has $P variables that are not in sequence.
Show Source: This gives you the option to preserve the original spacing and letter case of your macro code, or to have it formatted and auto-indented each time the macro is opened in the editor. There are two styles of formatting available: The “Standard” format uses uppercase and ANSI standard logical operators (e.g.,
IF/X.GT.0.AND.X.LE.10) whereas the “C” format uses lowercase and C style logical operators (e.g.,if/x>0&&x<=10). The choice of formatting style and whether or not to apply it when opening a macro for editing can be made from the “Macro Editor” tab of the Tools»Preferences menu-bar selection.
Pressing the F1 function key while the cursor is placed over a system variable or function name will bring up the on-line help with more information about the selected item.
You can select your own editor (called an “external” editor) to use instead of the default editor provided by QUEST. This is done from the “Macro Editor” tab of the Tools»Preferences menu-bar selection. You must define the full path and filename of the editor executable and include any necessary command line arguments. You must also choose the name of a file to be used as a placeholder for macros that you will edit. The macro file name must be unique to your own personal file space, to avoid interference with anyone else running QUEST.
Compiling and Saving Macros
When in the macro editor, you can use the “Compile” button to check that your code has been written correctly. Macros are always automatically compiled when you press the “OK” button after you have finished editing. The “Cancel” button ignores all changes made since you entered the macro editor for the current command. The “Reset” button ignores all changes, but keeps the macro editor active, showing the original macro code.
If a macro has compilation errors, the error diagnostics will be listed in the lower right-hand Build window. A macro must compile without errors in order for it to be used by GENER. You can force QUEST to exit a macro that has errors, but in this case the macro will be marked as non-executable (if any RMD custom macro component does not compile, then the entire RMD macro is marked as non-executable). This means that the macro cannot be used by GENER but remains available, as written, for editing at a later date with QUEST.
The “Strong Declaration” setting defines how strict the macro compiler is concerning the timing and location of macro variable declarations (see the “Declaration Macro”).
Ordering Macros
You can have more than one macro with the same post-processor command. When this is the case, GENER will try to find a match starting with the first one in the list. The order is not important when each macro has completely different syntax. But it becomes much more important when this is not the case. In the example shown in “The User-Defined Syntax Macro Facility” image, there is an AIR macro with the definition “AIR/*”. This SDL matches any AIR command. We can imagine that the author included it to simply output a diagnostic if none of the other AIR command macros were matched. If this AIR/* macro were placed in front of the others, then any AIR command would produce the diagnostic (i.e., GENER would match it first and as a result, would replace the original, potentially good, AIR command by a diagnostic message).
To change the order of a macro within a group of similarly named macros, select the macro and then use the up-arrow and down-arrow buttons to move it. You can also use the mouse to change the order by first selecting the macro and using drag-and-drop.
Modifying and Deleting Macros
Macros can be temporarily disabled by clearing the “Enable” check box that appears to the left of each definition in the main working window. Clearing this check box stops GENER from using the macro, but still keeps the macro associated with the post-processor.
You can modify or delete one or more macros by selecting them in the main working window and then pressing the Modify or Delete buttons.
When modifying multiple macros, QUEST will add a comment separator at the start of each macro as a visual aid. It will end each macro with an ENDMAC command. The comment separator will end with the word “disabled” if the macro is disabled. You can add or remove this keyword yourself from the comment line to enable or disable macros. The image below shows an example of two macros being edited at the same time.
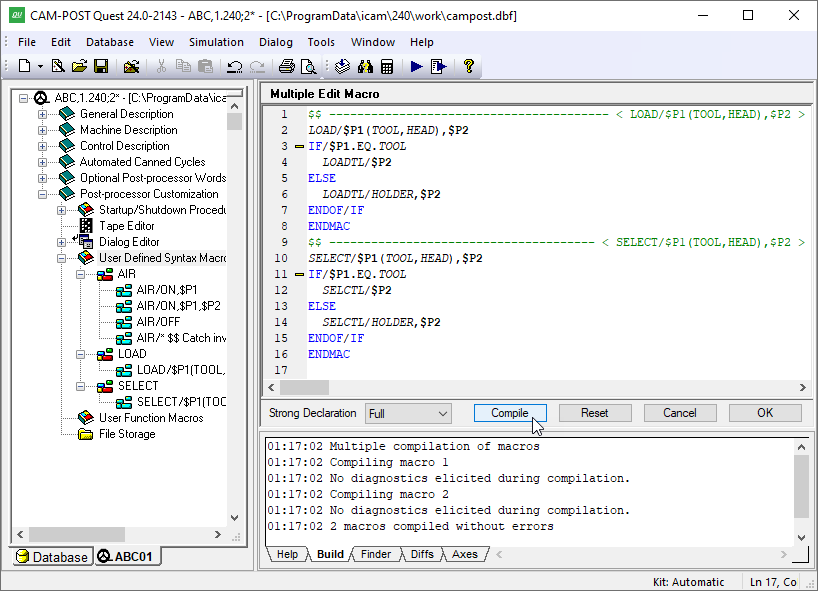
Editing multiple macros
User Function Macros
This section lets you define your own macro functions that can be called by other macros in the post-processor. This is done by creating macros that define a function name, the parameters to the function, and optionally the return type of the function. Functions defined in this section can be used in other post-processor macros and functions without having to declare them. See “The Macro Language” to learn how to program using the macro language.
Double-click on the “User Function Macros” selection in the Navigator to open the main macro view in the working window. This view shows all user function macros. An image of the User Function Macros main view is shown below.
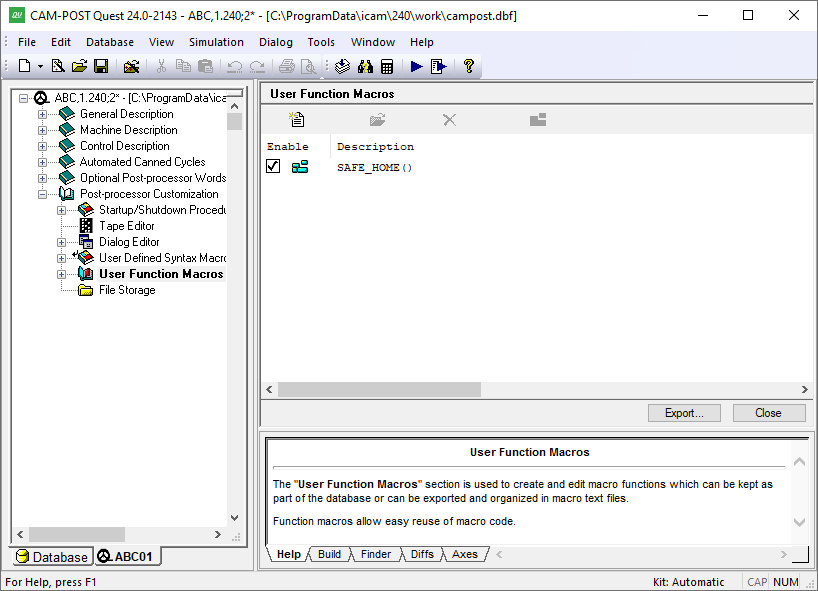
The User Function Macro Facility
The navigator lists function macros alphabetically by name. You can open a function macro for editing by double-clicking on the macro definition in the navigator or in the working window. You can also edit a function macro by selecting it in the working window and then pressing the “Modify” button. Only a single function macro can be edited at a time.
Adding Macros
Press the Add button to add a new function macro. You will be asked to enter a function name, which must start with an alphabetic character and consist of only letters, digits and the underscore character. The name cannot be longer than 32 characters. It also cannot be the same as any function name that is already defined.
When a new function macro is added, the macro editor occupies the main work space. The first line of the macro will contain the string “MACRO/” followed by the function macro name and open and closing parentheses ( ). This first line of the macro is called a Syntax Definition Line, or just SDL for short. The SDL defines the name of the function, its parameters and optionally the function return value type. More details of function macro SDLs can be found in “User Function Macros”.
The remaining lines of the macro (i.e., the body) define the actions to perform when the function macro is called. The macro processor first copies the variables and/or constants used by the caller into the parameter values of the function macro. It then processes the body of the function macro. When the macro completes, either by processing a TERMAC or ENDMAC command, the function macro then returns a value to the caller. This value must be set in the body of the function macro before returning, by setting a variable having the same name as the function macro name.
Exporting macros
Press the Export button to select the function macros to be written in ASCII format to the selected file. Each macro is followed by an ENDMAC command in the generated file.
There is no corresponding Import function.
Macro Editing, Compilation and Saving, Modification and Deleting
User function macro editing, compilation, saving, modification and deleting is the same as for User Defined macros, as described earlier starting here, with the following exceptions.
Only a single user function macro can be edited at a time.
Macro function names can be changed (i.e., renamed) simply by editing the macro function, modifying the function name in the SDL, and compiling and/or exiting.
Within the editor, there is no facility to resequence $P variables. That is because user function macros can use any name for the parameters of the function, whereas user defined macros are restricted to using a $Pn naming format for parameters.
User function macros are ordered alphabetically, with no duplicates allowed, so there is no concept of ordering macros to affect how they are matched as is done for code macros (i.e., the up and down arrow controls are disabled in the macro editor view).
User function macros cannot be disabled.
File Storage
The File Storage section can be used to store information in a file format that might be needed by GENER during macro processing. Although GENER can access files that reside on an external file system, placing these files inside the post-processor itself eliminates any dependencies the post-processor might have on external data.
Note
Files stored in the file storage section are read-only. This means that these files can be read or executed during GENER macro processing, but they cannot be written to, replaced or deleted. If a post-processor must access files for both read and write, then those files must reside in the regular “external” file system.
Double click on the File Storage entry in the Navigator to activate the File Storage facility. An image of the File Storage facility is shown below.

The File Storage Facility
The file storage section is organized with a directory browser on the left hand side of the main working window and a detailed file listing on the right hand side. Selecting a directory in the left hand window will display the contents of that directory in the right hand window. Use the right-mouse context sensitive pop-up window to add, rename or delete directories and files. You can drag and drop directories and files from an external file system into the file storage view. You can also drag and drop files and directories within the file storage facility to move or copy files. Standard Windows conventions apply for all drag and drop operations. Any operations performed in the File Storage facility will have no effect on the original files that reside in the external file system.
The OK button saves changes and exits the File Storage facility. The Cancel button exits the File Storage facility ignoring any changes that may have been made. The Reset button also undoes any changes that may have been made, but keeps the File Storage facility active.
The File Storage section can be used as follows:
A macro OPEN command (see “Opening a Text File (OPEN)” can reference a file in the internal File Storage for read-only purposes. Specify an absolute file path for the filename using an “//ICAMFS/” universal file descriptor (e.g., “//ICAMFS/toolno.dat”).
A macro DECLAR/EXTERN,FUNCTN command (see “External Functions”) can reference a DLL or Python file in the internal File Storage that contains the user function code to execute. Specify an absolute file path for the filename using an “//ICAMFS/” universal file descriptor (e.g., “//ICAMFS/mycode.dll” or “//ICAMFS/mycode.py”).
A macro SYSTEM command (see “Calling other programs (SYSTEM)”) can reference an EXE file in the internal File Storage that contains the program to execute. Specify an absolute file path for the filename using an “//ICAMFS/ ” universal file descriptor (e.g., “//ICAMFS/myprogram.exe”).
The File Storage facility initially stores all of its data in memory while you are editing a post-processor. The data is later stored in the database in a compressed format when Saving or Generating. GENER uncompresses the entire File Storage section into memory when the post-processor is later run.